第六章:PyTorch进阶训练技巧 DataWhale在线文档:https://datawhalechina.github.io/thorough-pytorch/第六章/index.html
6.1 自定义损失函数 在科学研究中,我们往往会提出全新的损失函数来提升模型的表现,此时我们需要自己设计损失函数。
(1)以函数方式定义 1 2 3 def my_loss(output, target): loss = torch.mean((output - target)**2) return loss
(2)以类方式定义 在以类方式定义损失函数时,我们如果看每一个损失函数的继承关系我们就可以发现Loss函数部分继承自_loss, 部分继承自_WeightedLoss, 而_WeightedLoss继承自_loss,_loss继承自 nn.Module 。我们可以将其当作神经网络的一层来对待,同样地,我们的损失函数类就需要继承自nn.Module 类。
例:Dice Loss [ DSC = \frac{2|X∩Y|}{|X|+|Y|} ]
1 2 3 4 5 6 7 8 9 10 11 12 13 14 15 class DiceLoss(nn.Module): def __init__(self,weight=None,size_average=True): super(DiceLoss,self).__init__() def forward(self,inputs,targets,smooth=1): inputs = F.sigmoid(inputs) inputs = inputs.view(-1) targets = targets.view(-1) intersection = (inputs * targets).sum() dice = (2.*intersection + smooth)/(inputs.sum() + targets.sum() + smooth) return 1 - dice # 使用方法 criterion = DiceLoss() loss = criterion(input,targets)
6.2 动态调整学习率 我们可以通过一个适当的学习率衰减策略来改善学习率不能满足模型调优需求的情况,提高我们的精度。这种方式称为scheduler。
(1)使用官方scheduler 一些封装在torch.optim.lr_scheduler中的调整学习率的方法
1 2 3 4 5 6 7 8 9 10 11 12 13 14 15 16 # 选择一种优化器 optimizer = torch.optim.Adam(...) # 选择上面提到的一种或多种动态调整学习率的方法 scheduler1 = torch.optim.lr_scheduler.... scheduler2 = torch.optim.lr_scheduler.... ... schedulern = torch.optim.lr_scheduler.... # 进行训练 for epoch in range(100): train(...) validate(...) optimizer.step() # 需要在优化器参数更新之后再动态调整学习率 scheduler1.step() ... schedulern.step() #放在optimizer.step()后面进行使用
(2)自定义scheduler 自定义函数adjust_learning_rate来改变param_group中lr的值
1 2 3 4 5 6 7 8 9 10 11 12 def adjust_learning_rate(optimizer, epoch): #根据需要改变 lr = .... for param_group in optimizer.param_groups: param_group['lr'] = lr def adjust_learning_rate(optimizer,...): ... optimizer = torch.optim.SGD(model.parameters(),lr = args.lr,momentum = 0.9) for epoch in range(10): train(...) validate(...) adjust_learning_rate(optimizer,epoch)
6.3 模型微调-torchvision 为解决数据集不足或花费较大的情况,使用迁移学习方法。
迁移学习的一大应用场景——预训练模型微调
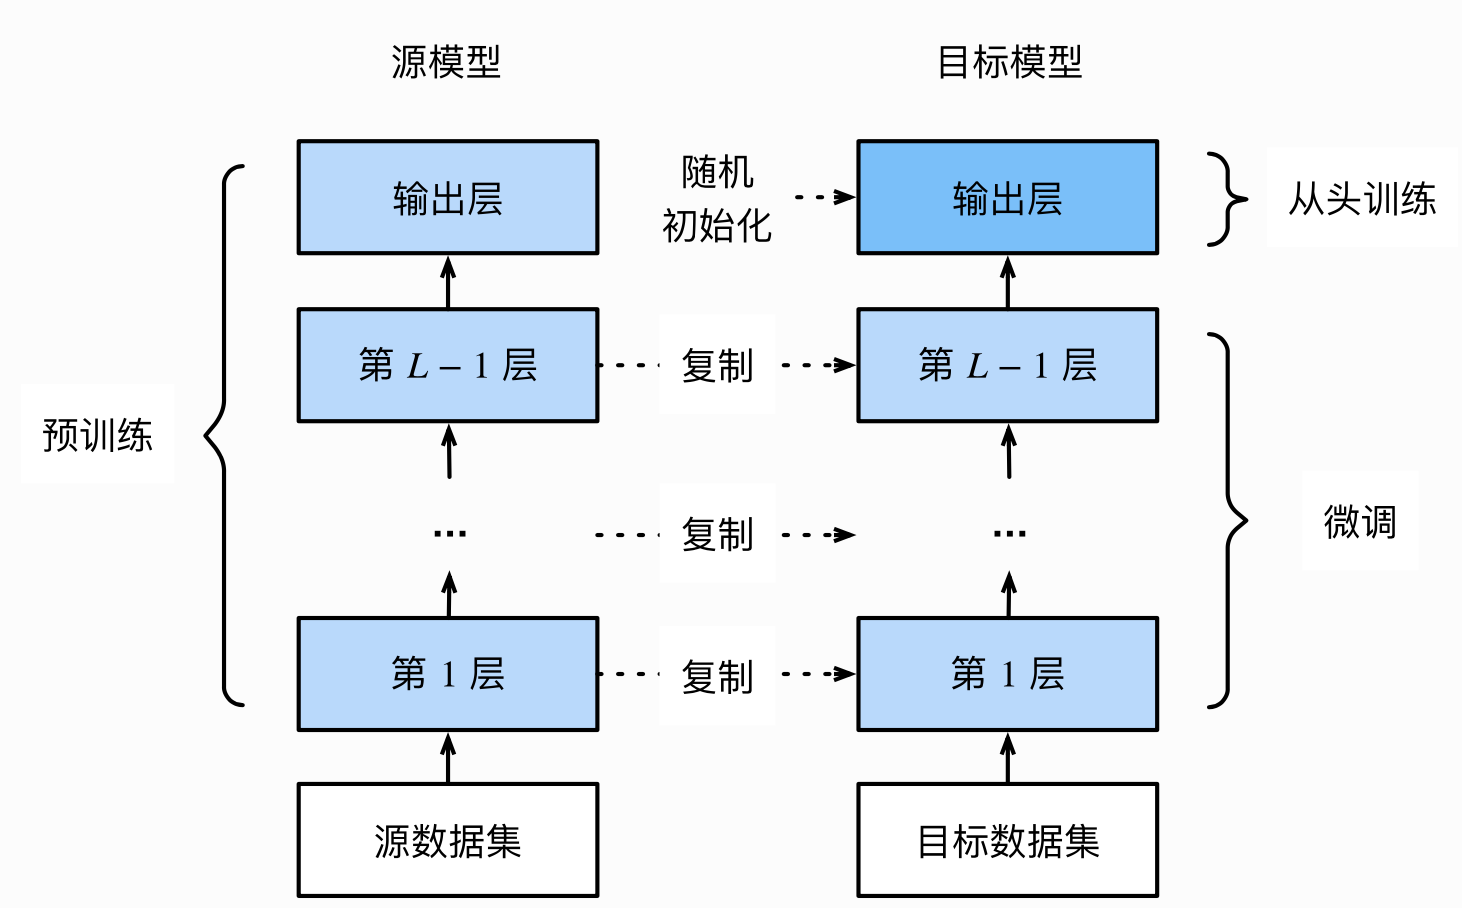
6.3.1 模型微调的流程
在源数据集上预训练一个模型,称源模型。
创建一个新的目标模型,复制源模型上除输出层外的所有模型设计及其参数。
为目标模型添加一个输出⼤小为⽬标数据集类别个数的输出层,并随机初始化该层的模型参数。
在目标数据集上训练目标模型。从头训练输出层,其余层的参数都是基于源模型的参数微调得到的。
我们假设这些模型参数包含了源数据集上学习到的知识,且这些知识同样适用于目标数据集。我们还假设源模型的输出层跟源数据集的标签紧密相关,因此在目标模型中不予采用。
(2)使用已有模型结构
实例化网络
1 2 3 4 5 6 7 8 9 10 11 12 13 14 15 16 import torchvision.models as models resnet18 = models.resnet18() # resnet18 = models.resnet18(pretrained=False) 等价于与上面的表达式 alexnet = models.alexnet() vgg16 = models.vgg16() squeezenet = models.squeezenet1_0() densenet = models.densenet161() inception = models.inception_v3() googlenet = models.googlenet() shufflenet = models.shufflenet_v2_x1_0() mobilenet_v2 = models.mobilenet_v2() mobilenet_v3_large = models.mobilenet_v3_large() mobilenet_v3_small = models.mobilenet_v3_small() resnext50_32x4d = models.resnext50_32x4d() wide_resnet50_2 = models.wide_resnet50_2() mnasnet = models.mnasnet1_0()
传递pretrained参数
通过True或者False来决定是否使用预训练好的权重,在默认状态下pretrained = False,意味着我们不使用预训练得到的权重,当pretrained = True,意味着我们将使用在一些数据集上预训练得到的权重。
1 2 import torchvision.models as models resnet18 = models.resnet18(pretrained=True)
注意事项:
通常PyTorch模型的扩展为.pt或.pth,程序运行时会检查默认路径是否有下载好的模型权重,权重下载后,下次加载不再需要下载。
一般下载较慢,可以直接迅雷或者其他方式去 这里 查看自己的模型里面model_urls,然后手动下载,预训练模型的权重在Linux和Mac的默认下载路径是用户根目录下的.cache文件夹。在Windows下就是C:\Users\<username>\.cache\torch\hub\checkpoint。可以通过使用 torch.utils.model_zoo.load_url()
还可以将权重自己下载放到同文件夹下,然后再将参数加载网络。
1 2 self.model = models.resnet50(pretrained=False) self.model.load_state_dict(torch.load('./model/resnet50-19c8e357.pth'))
如果中途强行停止下载,一定去对应路径下将权重文件删除干净,不然可能会报错。
(3)训练特定层 提取特征并且只想为新初始化的层计算梯度,其他参数不改变,就需要通过设置requires_grad = False来冻结部分层。
1 2 3 4 def set_parameter_requires_grad(model, feature_extracting): if feature_extracting: for param in model.parameters(): param.requires_grad = False
1 2 3 4 5 6 7 8 import torchvision.models as models # 冻结参数的梯度 feature_extract = True model = models.resnet18(pretrained=True) set_parameter_requires_grad(model, feature_extract) #引用上面 # 修改模型 num_ftrs = model.fc.in_features model.fc = nn.Linear(in_features=num_ftrs, out_features=4, bias=True)
仅改变最后一层的模型参数,不改变特征提取的模型参数;注意我们先冻结模型参数的梯度,再对模型输出部分的全连接层进行修改,这样修改后的全连接层的参数就是可计算梯度的。之后在训练过程中,model仍会进行梯度回传,但是参数更新则只会发生在fc层。通过设定参数的requires_grad属性,我们完成了指定训练模型的特定层的目标,这对实现模型微调非常重要。
6.4 模型微调 - timm timm是另一个预训练模型库,提供了许多计算机视觉的SOTA模型,可以当作是torchvision的扩充版本,并且里面的模型在准确度上也较高。
原文:https://datawhalechina.github.io/thorough-pytorch/第六章/6.3%20模型微调-timm.html
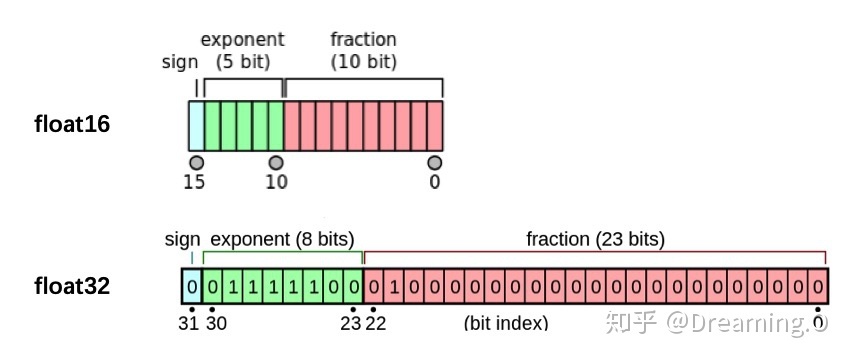
6.5半精度训练 PyTorch默认的浮点数存储方式用的是torch.float32,多数场景其实并不需要这么精确,因此可进行半精度训练(torch.float16)以减少显存使用。
如何设置:
1 from torch.cuda.amp import autocast
在模型定义中,使用python的装饰器方法,用autocast装饰模型中的forward函数。关于装饰器的使用,可以参考这里 :
1 2 3 4 @autocast() def forward(self, x): ... return x
在训练过程中,只需在将数据输入模型及其之后的部分放入“with autocast():“即可:
1 2 3 4 5 for x in train_loader: x = x.cuda() with autocast(): output = model(x) ...
6.6 数据增强-imgaug 深度学习需要大量数据,当数据量不够时,可使用数据增强技术,提高训练数据集的大小和质量。
(1)imgaug imgaug是计算机视觉任务中常用的一个数据增强的包,相比于torchvision.transforms,它提供了更多的数据增强方法。
Github地址:imgaug
Readthedocs:imgaug
官方提供notebook例程:notebook
安装:
conda 1 2 conda config --add channels conda-forge conda install imgaug
pip 1 2 3 4 5 6 7 # install imgaug either via pypi pip install imgaug # install the latest version directly from github pip install git+https://github.com/aleju/imgaug.git
具体:https://datawhalechina.github.io/thorough-pytorch/第六章/6.5%20数据增强-imgaug.html
6.7 使用argparse进行调参 解析我们输入的命令行参数再传入模型的超参数中
命令行输入python file.py --lr 1e-4 --batch_size 32来完成对常见超参数的设置
(1)使用
创建ArgumentParser()对象
调用add_argument()方法添加参数
使用parse_args()解析参数
1 2 3 4 5 6 7 8 9 10 11 12 13 14 15 16 17 18 19 20 21 # demo.py import argparse # 创建ArgumentParser()对象 parser = argparse.ArgumentParser() # 添加参数 parser.add_argument('-o', '--output', action='store_true', help="shows output") # action = `store_true` 会将output参数记录为True # type 规定了参数的格式 # default 规定了默认值 parser.add_argument('--lr', type=float, default=3e-5, help='select the learning rate, default=1e-3') parser.add_argument('--batch_size', type=int, required=True, help='input batch size') # 使用parse_args()解析函数 args = parser.parse_args() if args.output: print("This is some output") print(f"learning rate:{args.lr} ")
我们在命令行使用python demo.py --lr 3e-4 --batch_size 32,就可以看到以下的输出
1 2 This is some output learning rate: 3e-4
(2)原文作者的方法 每个人都有着不同的超参数管理方式,在这里我将分享我使用argparse管理超参数的方式,希望可以对大家有一些借鉴意义。通常情况下,为了使代码更加简洁和模块化,我一般会将有关超参数的操作写在config.py,然后在train.py或者其他文件导入就可以。具体的config.py可以参考如下内容。
1 2 3 4 5 6 7 8 9 10 11 12 13 14 15 16 17 18 19 20 21 22 23 24 25 26 27 28 29 30 31 32 33 34 35 36 37 38 39 40 41 42 43 44 45 import argparse def get_options(parser=argparse.ArgumentParser()): parser.add_argument('--workers', type=int, default=0, help='number of data loading workers, you had better put it ' '4 times of your gpu') parser.add_argument('--batch_size', type=int, default=4, help='input batch size, default=64') parser.add_argument('--niter', type=int, default=10, help='number of epochs to train for, default=10') parser.add_argument('--lr', type=float, default=3e-5, help='select the learning rate, default=1e-3') parser.add_argument('--seed', type=int, default=118, help="random seed") parser.add_argument('--cuda', action='store_true', default=True, help='enables cuda') parser.add_argument('--checkpoint_path',type=str,default='', help='Path to load a previous trained model if not empty (default empty)') parser.add_argument('--output',action='store_true',default=True,help="shows output") opt = parser.parse_args() if opt.output: print(f'num_workers: {opt.workers}') print(f'batch_size: {opt.batch_size}') print(f'epochs (niters) : {opt.niter}') print(f'learning rate : {opt.lr}') print(f'manual_seed: {opt.seed}') print(f'cuda enable: {opt.cuda}') print(f'checkpoint_path: {opt.checkpoint_path}') return opt if __name__ == '__main__': opt = get_options() $ python config.py num_workers: 0 batch_size: 4 epochs (niters) : 10 learning rate : 3e-05 manual_seed: 118 cuda enable: True checkpoint_path:
随后在train.py等其他文件,我们就可以使用下面的这样的结构来调用参数。
1 2 3 4 5 6 7 8 9 10 11 12 13 14 15 16 17 18 19 20 21 22 23 24 25 26 27 28 29 30 # 导入必要库 ... import config opt = config.get_options() manual_seed = opt.seed num_workers = opt.workers batch_size = opt.batch_size lr = opt.lr niters = opt.niters checkpoint_path = opt.checkpoint_path # 随机数的设置,保证复现结果 def set_seed(seed): torch.manual_seed(seed) torch.cuda.manual_seed_all(seed) random.seed(seed) np.random.seed(seed) torch.backends.cudnn.benchmark = False torch.backends.cudnn.deterministic = True ... if __name__ == '__main__': set_seed(manual_seed) for epoch in range(niters): train(model,lr,batch_size,num_workers,checkpoint_path) val(model,lr,batch_size,num_workers,checkpoint_path)